Chapter 2. Installing Red Hat Enterprise Linux
This chapter explains how to perform a Red Hat Enterprise Linux installation from the CD-ROM, using the graphical, mouse-based installation program. The following topics are discussed:
Becoming familiar with the installation program's user interface
Starting the installation program
Selecting an installation method
Configuration steps during the installation (language, keyboard, mouse, partitioning, etc.)
Finishing the installation
2.1. The Graphical Installation Program User Interface
If you have used a graphical user interface (GUI) before, you are already familiar with this process; use your mouse to navigate the screens, click buttons, or enter text fields.
You can also navigate through the installation using the
keyboard. The
If you would like to use a graphical installation with a system that does not have that capability, such as a partitioned system, you can use VNC or display forwarding. Both the VNC and display forwarding installation options require an active network during the installation and the use of boot time arguments. For more information on available boot time options, refer to Appendix E Additional Boot Options.
 | Note | |
|---|---|---|
If you do not wish to use the GUI installation program, the text mode installation program is also available. To start the text mode installation program, use the following boot command:
Please refer to Section 2.2 The Text Mode Installation Program User Interface for a brief overview of text mode installation instructions. It is highly recommended that installs be performed using the GUI installation program. The GUI installation program offers the full functionality of the Red Hat Enterprise Linux installation program, including LVM configuration which is not available during a text mode installation. Users who must use the text mode installation program can easily follow the GUI installation instructions and obtain all needed information. iSeries system users must remember to add boot options, as are listed in this manual (Appendix E Additional Boot Options) for other operating systems, by first logging into an OS/400 system as an iSeries user and then setting any IPL parameters within their OS/400 session. |
2.1.1. Booting the OpenPower, p5, i5, and pSeries Installation Program
To boot an OpenPower, p5, i5, or pSeries system from a CD-ROM, you must specify the install boot device in the System Management Services (SMS) menu.
To enter the System Management Services GUI, press
the
On a text console, press
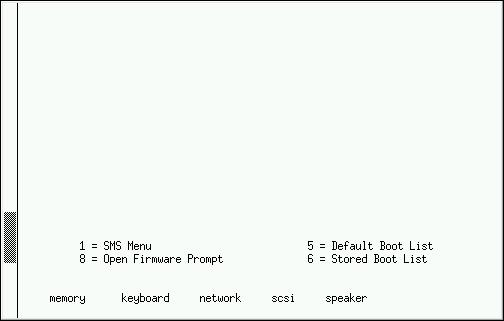
Once in the SMS menu, select the option for Select Boot Options. In that menu, specify Select Install or Boot a Device. There, select CD/DVD, and then the bus type (in most cases SCSI). If you are uncertain, you can select to view all devices. This scans all available buses for boot devices, including network adapters and hard drives.
Finally, select the device containing the installation CD. YABOOT is
loaded from this device and you are presented with a boot:
prompt. Press
If you are booting a non-iSeries system (or booting a *STMF on i5) via the network, use the images/netboot.img file on CD #1.
2.1.2. Booting the iSeries Installation Program
Insert the installation CD into the CD-ROM drive. Determine the volume name by which OS/400 refers to the CD. This can be found by executing the command wrklnk '/qopt/*' at the OS/400 command line. WRKOPTVOL gives more information on the optical media. Unless there is another CD with the same label in another drive, the volume name is Red_Hat. Note, if the volume name includes a timestamp (as it does when there are name conflicts), ejecting and re-inserting the CD causes the volume name to change and you must determine what it is again.
Ensure that your Network Server (NWS) is varied off using the OS/400 WRKCFGSTS (*nws) command.
Edit the Network Server Description (NWSD). Set the IPL source field to *STMF.
Set the IPL stream file field to /QOPT/RED_HAT/PPC/ISERIES/BOOT.IMG (case is not significant), where Red_Hat is the name of the CD volume as it appears under /QOPT.
Set the IPL parameters option to 'dd' (including quotes) if you are using a driver. Otherwise, set the option to *NONE.
| Note |
|---|---|
Red Hat recommends using the vnc or display=<workstation> boot commands to begin a graphical installation. Otherwise, set the field to *NONE to perform a text mode installation. On your workstation, be sure to set the xhost+ command to the hostname of the system being installed. For more information on available boot commands, refer to Appendix E Additional Boot Options. |
Use a Telnet client to connect to the virtual console of the OS/400 partition hosting your Linux partition using a command like telnet <hosting partition> 2301. Refer to Section 2.1.5 Using the iSeries Virtual Console for more details on using the virtual console.
Vary on the NWS. The boot sequence begins on the virtual console in a few seconds. The installation program begins automatically. If you are performing a VNC or X-Host based installation, network information can be configured via a virtual console.
2.1.3. A Note about Virtual Consoles on OpenPower, p5, and pSeries
This information only applies to users of non-partitioned OpenPower, p5, and pSeries systems using a video card as their console. Users of partitioned OpenPower, p5, i5, and pSeries systems should skip to Section 2.1.4 Using the HMC vterm, while users of iSeries should skip to Section 2.1.5 Using the iSeries Virtual Console.
The Red Hat Enterprise Linux installation program offers more than the dialog boxes of the installation process. Several kinds of diagnostic messages are available to you, as well as a way to enter commands from a shell prompt. The installation program displays these messages on five virtual consoles, among which you can switch using a single keystroke combination.
A virtual console is a shell prompt in a non-graphical environment, accessed from the physical machine, not remotely. Multiple virtual consoles can be accessed simultaneously.
These virtual consoles can be helpful if you encounter a problem while installing Red Hat Enterprise Linux. Messages displayed on the installation or system consoles can help pinpoint a problem. Refer to Table 2-1 for a listing of the virtual consoles, keystrokes used to switch to them, and their contents.
Generally, there is no reason to leave the default console (virtual console #7 for graphical installations or virtual console #1 for text-based installations) unless you are attempting to diagnose installation problems.
| Console | Keystrokes | Contents |
|---|---|---|
| 1 | | installation dialog |
| 2 | | shell prompt |
| 3 | | install log (messages from installation program) |
| 4 | | system-related messages |
| 5 | | other messages |
| 7 | | X graphical display |
Table 2-1. Console, Keystrokes, and Contents
2.1.4. Using the HMC vterm
The HMC vterm is the console for any partitioned OpenPower, p5, i5, or pSeries system. This is opened by right clicking on the partition on the HMC, and then selecting Open Terminal Window. Only a single vterm can be connected to the console at one time and there is no console access for partitioned system besides the vterm. This often is referred to as a 'virtual console', but is different from the virtual consoles in Section 2.1.3 A Note about Virtual Consoles on OpenPower, p5, and pSeries or the iSeries virtual console in Section 2.1.5 Using the iSeries Virtual Console.
2.1.5. Using the iSeries Virtual Console
Before you can use the iSeries virtual console for installation, you must create a DST userid and give it authority to access the virtual console. In V5R2 you simply start SST (STRSST from the command line of the hosting OS/400 partition) and select option 8, Work with service tools user IDs. You cannot use the QSECOFR userid to access the virtual console, you must create a new userid. Once you have created your userid, give it Partition remote panel key access for your Linux partition.
To access the virtual console, use the command telnet <systemname> 2301 where <systemname> is the hostname of the OS/400 partition. When it connects, the virtual console lists the Linux partitions hosted by that OS/400 partition. Select the partition number and enter your DST userid and password as prompted.
The virtual console is usable from a variety of Telnet clients, but it works best when used either from Linux-based X terminals (or GNOME terminals) using the standard telnet client or the MS Windows PuTTY client. Other Telnet clients, such as the standard Windows Telnet client, have problems with the virtual console's rendering of the text based installation program or the control sequences in programs such as vi, so their use is not recommended.