18.12. Establishing an IPsec Connection
IPsec stands for Internet Protocol Security. It is a Virtual Private Network (VPN) solution in which an encrypted connection is established between two systems (host-to-host) or two networks (network-to-network).
 | Tip |
|---|---|
Go to http://www.ipsec-howto.org/ for more information about IPsec. |
18.12.1. Host-to-Host Connection
A host-to-host IPsec connection is an encrypted connection between two systems both running IPsec with the same authentication key. With the IPsec connection active, any network traffic between the two hosts is encrypted.
To configure a host-to-host IPsec connection, use the following steps for each host:
Start the Network Administration Tool.
From the IPsec tab, select New.
Click Forward to start configuring a host-to-host IPsec connection.
Provide a one word nickname such as ipsec0 for the connection, and select whether the connection should be automatically activated when the computer starts. Click Forward.
Select Host to Host encryption as the connection type. Click Forward.
Select the type of encryption to use: manual or automatic.
If manual is selected, an encryption key must be provided later in the process. If automatic is selected, the racoon daemon is used to manage the encryption key. If racoon is used, the ipsec-tools package must be installed.
Click Forward to continue.
Specify the IP address of the other host.
If you do not know the IP address of the other system, run the command /sbin/ifconfig <device> on the other system, where <device> is the Ethernet device used to connect to the other host. If only one Ethernet card exists in the system, the device name is eth0. The IP address is the number following the inet addr: label.
Click Forward to continue.
If manual encryption was selected in step 6, specify the encryption key to use or click Generate to create one.
Specify an authentication key or click Generate to generate one. It can be any combination of numbers and letters.
Click Forward to continue.
Verify the information on the IPsec — Summary page, and click Apply.
Select File => Save to save the configuration.
Select the IPsec connection from the list and click the Activate button.
Repeat for the other host. It is extremely important that the same keys from step 8 be used on the other hosts. Otherwise, IPsec does not work.
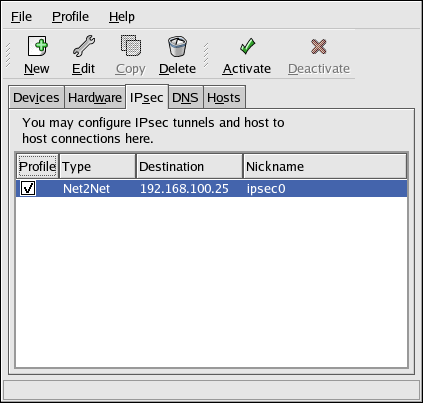
After configuring the IPsec connection, it appears in the IPsec list as shown in Figure 18-19.
Two files are created in the /etc/sysconfig/network-scripts/ directory — ifcfg-<nickname> and keys-<nickname>. If automatic encryption is selected, /etc/racoon/racoon.conf is created as well.
When the interface is activated, <remote-ip>.conf and psk.txt are created in /etc/racoon/, and racoon.conf is modified to include <remote-ip>.conf.
Refer to Section 18.12.3 Testing the IPsec Connection to determine if the IPsec connection has been successfully established.
18.12.2. Network-to-Network (VPN) Connection
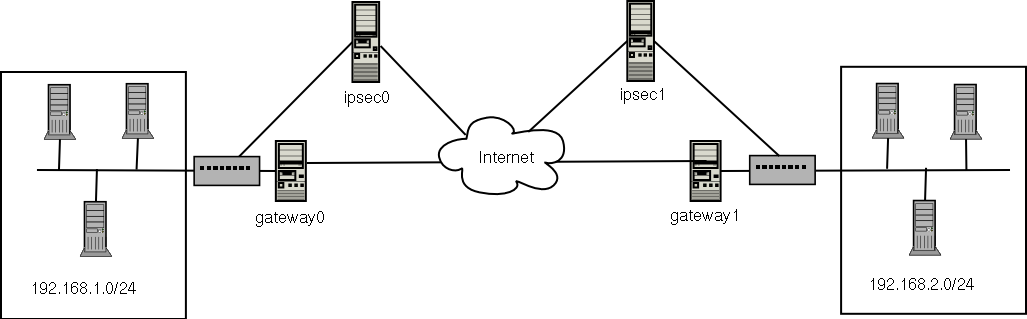
A network-to-network IPsec connection uses two IPsec routers, one for each network, through which the network traffic for the private subnets is routed.
For example, as shown in Figure 18-20, if the 192.168.0/24 private network sends network traffic to the 192.168.2.0/24 private network, the packets go through gateway0, to ipsec0, through the Internet, to ipsec1, to gateway1, and to the 192.168.2.0/24 subnet.
The IPsec routers must have publicly addressable IP addresses as well as another Ethernet device connected to its private network. Traffic only travels through it if it is intended for the other IPsec router with which it has an encrypted connection.
Alternate network configurations options include a firewall between each IP router and the Internet, and an Intranet firewall between each IPsec router and subnet gateway. The IPsec router and the gateway for the subnet can be one system with two Ethernet devices, one with a public IP address that acts as the IPsec router and one with a private IP address that acts as the gateway for the private subnet. Each IPsec router can use the gateway for its private network or a public gateway to send the packets to the other IPsec router.
To configure a network-to-network IPsec connection, use the following steps:
Start the Network Administration Tool.
From the IPsec tab, select New.
Click Forward to start configuring a network-to-network IPsec connection.
Provide a one word nickname, such as ipsec0, for the connection and select whether the connection should be automatically activated when the computer starts. Click Forward.
Select Network to Network encryption (VPN), and click Forward.
Select the type of encryption to use: manual or automatic.
If manual is selected, an encryption key must be provided later in the process. If automatic is selected, the racoon daemon is used to manage the encryption key. If racoon is used, the ipsec-tools package must be installed. Click Forward to continue.
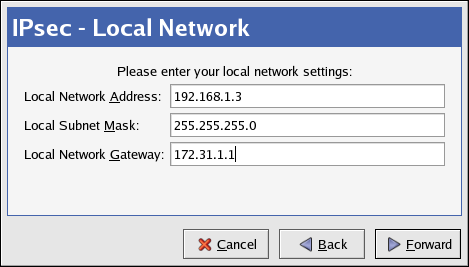
On the Local Network page, enter the following information:
Local Network Address — The IP address of the device on the IPsec router connected to the private network.
Local Subnet Mask — The subnet mask of the local network IP address.
Local Network Gateway — The gateway for the private subnet.
Click Forward to continue.
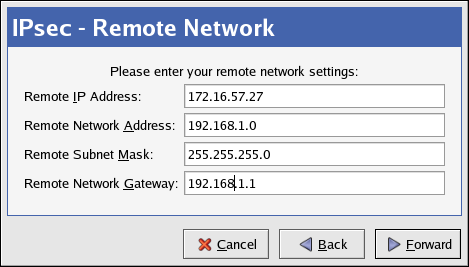
On the Remote Network page, enter the following information:
Remote IP Address — The publicly addressable IP address of the IPsec router for the other private network. In our example, for ipsec0, enter the publicly addressable IP address of ipsec1, and vice versa.
Remote Network Address — The network address of the private subnet behind the other IPsec router. In our example, enter 192.168.1.0 if configuring ipsec1, and enter 192.168.2.0 if configuring ipsec0.
Remote Subnet Mask — The subnet mask of the remote IP address.
Remote Network Gateway — The IP address of the gateway for the remote network address.
If manual encryption was selected in step 6, specify the encryption key to use or click Generate to create one.
Specify an authentication key or click Generate to generate one. It can be any combination of numbers and letters.
Click Forward to continue.
Verify the information on the IPsec — Summary page, and click Apply.
Select File => Save to save the configuration.
Select the IPsec connection from the list, and click the Activate button.
As root at a shell prompt, enable IP forwarding:
Edit /etc/sysctl.conf and set net.ipv4.ip_forward to 1.
Execute the following command to enable the change:
/sbin/sysctl -p /etc/sysctl.conf
The network script to activate the IPsec connection automatically creates network routes to send packets through the IPsec router if necessary.
Refer to Section 18.12.3 Testing the IPsec Connection to determine if the IPsec connection has been successfully established.
18.12.3. Testing the IPsec Connection
Use the tcpdump utility to view the network packets being transfered between the hosts (or networks) and verify that they are encrypted via IPsec. The packet should include an AH header and should be shown as ESP packets. ESP means it is encrypted. For example, issue the following command as root:
# tcpdump 17:13:20.617872 pinky.example.com > ijin.example.com: \ AH(spi=0x0aaa749f,seq=0x335): ESP(spi=0x0ec0441e,seq=0x335) (DF) |
The tcpdump command outputs live network traffic. A
few seconds after starting tcpdump, manually kill
the process by pressing
An advanced IPsec test would require four systems, which would fulfill a full multi-homed IPsec network, but is not discussed here.
18.12.4. Starting and Stopping the Connection
If the IPsec connection was not configured to activate on boot, start and stop it as root via the command line.
To start the connection, execute the following command as root on each host for host-to-host IPsec or each IPsec router for network-to-network IPsec (replace <ipsec-nick> with the one word nickname configured earlier, such as ipsec0):
/sbin/ifup <ipsec-nick> |
To stop the connection, execute the following command as root on each host for host-to-host IPsec or each IPsec router for network-to-network IPsec (replace <ipsec-nick> with the one word nickname configured earlier, such as ipsec0):
/sbin/ifdown <ipsec-nick> |