3.4. Configuring the Cluster Software
Before describing the steps to configure the cluster software, the hierarchical structure of cluster members and services needs to be considered. Cluster members and services can be thought of in terms of a parent/child tree structure, as shown in Figure 3-6.
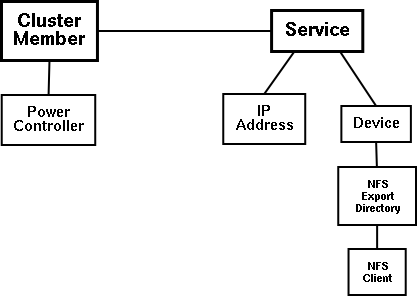
Each member can have power controller children. Each service can have IP address children. Each Service can also have device children. Each device can have NFS export directory children. Each NFS export directory can have client children. This structure is reflected in the /etc/cluster.xml file syntax.
The steps to configure the cluster software consist of the following:
Edit the /etc/sysconfig/rawdevices file on all cluster members and specify the raw device special files and character devices for the primary and backup shared partitions as described in Section 2.4.4.3 Configuring Shared Cluster Partitions and Section 3.5 Editing the rawdevices File.
Run the Cluster Configuration Tool on one cluster member.
Enter a name for the cluster in the Cluster Name field. The name should be descriptive enough to distinguish it from other clusters and systems on your network (for example, nfs_cluster or httpd_cluster).
Choose Cluster => Shared State, and confirm that the Raw Primary and Raw Shadow settings match the settings specified in step 1. The default for Raw Primary is /dev/raw/raw1. The default for Raw Shadow is /dev/raw/raw2.
Choose Cluster => Daemon Properties to edit the daemon properties. Each daemon has its own tab. Update the daemon options to suit your preferences and operating environment, and click OK when done. Refer to Section 3.6 Configuring Cluster Daemons for more details.
Add member systems to the cluster by selecting the Members tab and clicking the New button. Refer to Section 3.7 Adding and Deleting Members for details.
If the hardware configuration includes power controllers (power switches), then for each member connected to a power controller, configure that member's connection to the power controller by selecting the member and clicking Add Child. Refer to Section 3.8 Configuring a Power Controller Connection for more information.
Set up one or more failover domains, if needed, to restrict the members on which a service can run or restrict the order of members followed when a service fails over from one failover domain member to another (or both). Refer to Section 3.9 Configuring a Failover Domain for details.
Configure the application services to be managed by the cluster, specifying IP addresses, failover domain (if applicable) and user script that manages the service. Refer to Section 3.10 Adding a Service to the Cluster for more information.
Save cluster configuration changes by selecting File => Save. When you save the cluster configuration, the command service clumanager reload command is executed to cause the cluster software to load the changed configuration file.
Quit the application by selecting File => Quit.
Running the Cluster Configuration Tool for the first time causes the cluster configuration file /etc/cluster.xml to be created automatically. When quiting after running it for the first time, you are prompted to Press 'OK' to initialize Shared Storage, which uses the shared partitions to pass quorum and service state information between cluster members. Click OK to initialize the shared storage.

Note Shared storage must be initialized before starting the cluster service for the first time, or the cluster will not run properly.
After completing the cluster software configuration on one member, copy the configuration file /etc/cluster.xml to all other cluster members. The scp can be used to copy files from one host to another.