Chapter 12. Software RAID Configuration
Read Chapter 3 Redundant Array of Independent Disks (RAID) first to learn about RAID, the differences between Hardware and Software RAID, and the differences between RAID 0, 1, and 5.
Software RAID can be configured during the graphical installation of Red Hat Enterprise Linux or during a kickstart installation. This chapter discusses how to configure software RAID during installation, using the Disk Druid interface.
Before you can create a RAID device, you must first create RAID partitions, using the following step-by-step instructions:
On the Disk Partitioning Setup screen, select Manually partition with Disk Druid.
In Disk Druid, choose New to create a new partition.
Choose software RAID from the File System Type pulldown menu as shown in Figure 12-1.
You will not be able to enter a mount point (you will be able to do that once you have created your RAID device).
A software RAID partition must be constrained to one drive. For Allowable Drives, select the drive on which RAID will be created. If you have multiple drives, all drives will be selected, and you must deselect all but one drive.
Enter the size that you want the partition to be.
Select Fixed size to make the partition the specified size, select Fill all space up to (MB) and enter a size in MBs to give range for the partition size, or select Fill to maximum allowable size to make it grow to fill all available space on the hard disk. If you make more than one partition growable, they will share the available free space on the disk.
Select Force to be a primary partition if you want the partition to be a primary partition.
Click OK to return to the main screen.

Repeat these steps to create as many partitions as needed for your RAID setup. Notice that all the partitions do not have to be RAID partitions. For example, you can configure only the /home partition as a software RAID device.
Once you have all of your partitions created as software RAID partitions, follow these steps:
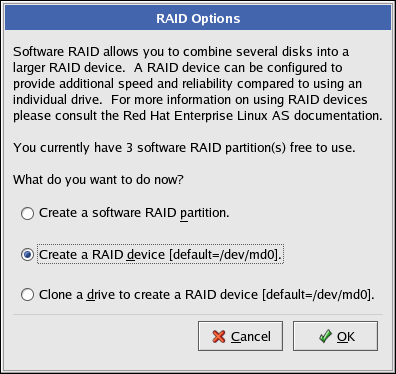
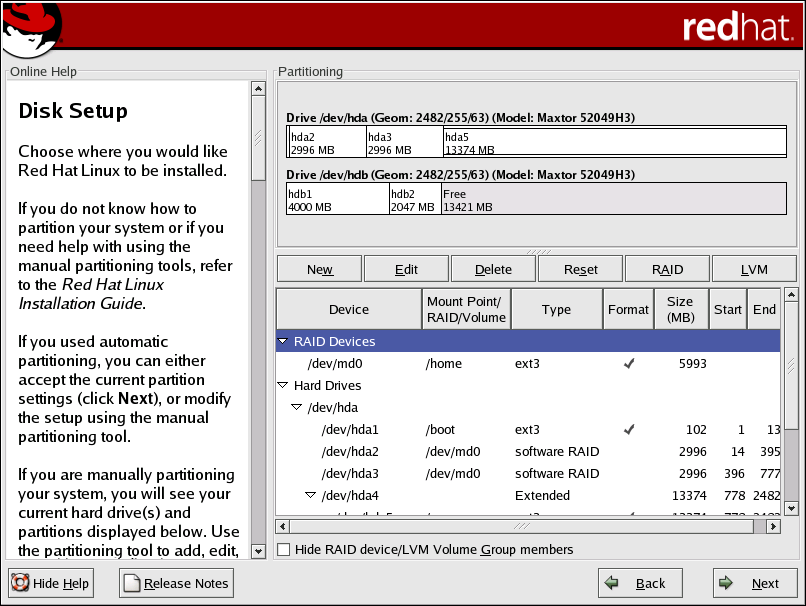
Select the RAID button on the Disk Druid main partitioning screen (refer to Figure 12-4).
Figure 12-2 will appear. Select Create a RAID device.
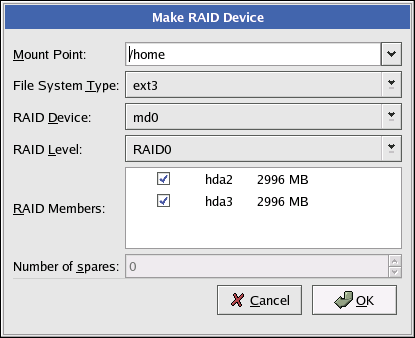
Next, Figure 12-3 will appear, where you can make a RAID device.
Enter a mount point.
Choose the file system type for the partition.
Select a device name such as md0 for the RAID device.
Choose your RAID level. You can choose from RAID 0, RAID 1, and RAID 5.

Note If you are making a RAID partition of /boot, you must choose RAID level 1, and it must use one of the first two drives (IDE first, SCSI second). If you are not creating a RAID partition of /boot, and you are making a RAID partition of /, it must be RAID level 1 and it must use one of the first two drives (IDE first, SCSI second).
The RAID partitions you just created appear in the RAID Members list. Select which partitions of these partitions should be used to create the RAID device.
If configuring RAID 1 or RAID 5, specify the number of spare partitions. If a software RAID partition fails, the spare will automatically be used as a replacement. For each spare you want to specify, you must create an additional software RAID partition (in addition to the partitions for the RAID device). In the previous step, select the partitions for the RAID device and the partition(s) for the spare(s).
After clicking OK, the RAID device will appear in the Drive Summary list as shown in Figure 12-4. At this point, you can continue with your installation process. Refer to the Red Hat Enterprise Linux Installation Guide for further instructions.