3.8. Configuring a Failover Domain
A failover domain is a named subset of cluster nodes that are eligible to run a cluster service in the event of a node failure. A failover domain can have the following characteristics:
Unrestricted — Allows you to specify that a subset of members are preferred, but that a cluster service assigned to this domain can run on any available member.
Restricted — Allows you to restrict the members that can run a particular cluster service. If none of the members in a restricted failover domain are available, the cluster service cannot be started (either manually or by the cluster software).
Unordered — When a cluster service is assigned to an unordered failover domain, the member on which the cluster service runs is chosen from the available failover domain members with no priority ordering.
Ordered — Allows you to specify a preference order among the members of a failover domain. The member at the top of the list is the most preferred, followed by the second member in the list, and so on.
By default, failover domains are unrestricted and unordered.
In a cluster with several members, using a restricted failover domain can minimize the work to set up the cluster to run a cluster service (such as httpd), which requires you to set up the configuration identically on all members that run the cluster service). Instead of setting up the entire cluster to run the cluster service, you must set up only the members in the restricted failover domain that you associate with the cluster service.
 | Tip |
|---|---|
To configure a preferred member, you can create an unrestricted failover domain comprising only one cluster member. Doing that causes a cluster service to run on that cluster member primarily (the preferred member), but allows the cluster service to fail over to any of the other members. |
The following sections describe adding a failover domain, removing a failover domain, and removing members from a failover domain:
3.8.1. Adding a Failover Domain
To add a failover domain, follow these steps:
At the left frame of the the Cluster Configuration Tool, click Failover Domains.
At the bottom of the right frame (labeled Properties), click the Create a Failover Domain button. Clicking the Create a Failover Domain button causes the Add Failover Domain dialog box to be displayed.
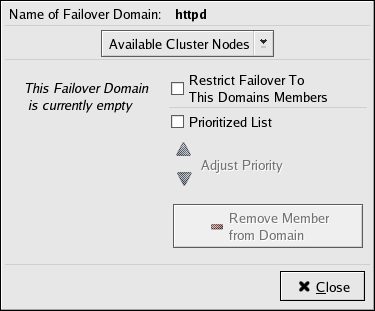
At the Add Failover Domain dialog box, specify a failover domain name at the Name for new Failover Domain text box and click OK. Clicking OK causes the Failover Domain Configuration dialog box to be displayed (Figure 3-10).

Note The name should be descriptive enough to distinguish its purpose relative to other names used in your cluster.
Click the Available Cluster Nodes drop-down box and select the members for this failover domain.
To restrict failover to members in this failover domain, click (check) the Restrict Failover To This Domains Members checkbox. (With Restrict Failover To This Domains Members checked, services assigned to this failover domain fail over only to nodes in this failover domain.)
To prioritize the order in which the members in the failover domain assume control of a failed cluster service, follow these steps:
Click (check) the Prioritized List checkbox (Figure 3-11). Clicking Prioritized List causes the Priority column to be displayed next to the Member Node column.
For each node that requires a priority adjustment, click the node listed in the Member Node/Priority columns and adjust priority by clicking one of the Adjust Priority arrows. Priority is indicated by the position in the Member Node column and the value in the Priority column. The node priorities are listed highest to lowest, with the highest priority node at the top of the Member Node column (having the lowest Priority number).
Click Close to create the domain.
At the Cluster Configuration Tool, perform one of the following actions depending on whether the configuration is for a new cluster or for one that is operational and running:
New cluster — If this is a new cluster, choose File => Save to save the changes to the cluster configuration.
Running cluster — If this cluster is operational and running, and you want to propagate the change immediately, click the Send to Cluster button. Clicking Send to Cluster automatically saves the configuration change. If you do not want to propagate the change immediately, choose File => Save to save the changes to the cluster configuration.

3.8.2. Removing a Failover Domain
To remove a failover domain, follow these steps:
At the left frame of the the Cluster Configuration Tool, click the failover domain that you want to delete (listed under Failover Domains).
At the bottom of the right frame (labeled Properties), click the Delete Failover Domain button. Clicking the Delete Failover Domain button causes a warning dialog box do be displayed asking if you want to remove the failover domain. Confirm that the failover domain identified in the warning dialog box is the one you want to delete and click Yes. Clicking Yes causes the failover domain to be removed from the list of failover domains under Failover Domains in the left frame of the Cluster Configuration Tool.
At the Cluster Configuration Tool, perform one of the following actions depending on whether the configuration is for a new cluster or for one that is operational and running:
New cluster — If this is a new cluster, choose File => Save to save the changes to the cluster configuration.
Running cluster — If this cluster is operational and running, and you want to propagate the change immediately, click the Send to Cluster button. Clicking Send to Cluster automatically saves the configuration change. If you do not want to propagate the change immediately, choose File => Save to save the changes to the cluster configuration.
3.8.3. Removing a Member from a Failover Domain
To remove a member from a failover domain, follow these steps:
At the left frame of the the Cluster Configuration Tool, click the failover domain that you want to change (listed under Failover Domains).
At the bottom of the right frame (labeled Properties), click the Edit Failover Domain Properties button. Clicking the Edit Failover Domain Properties button causes the Failover Domain Configuration dialog box to be displayed (Figure 3-10).
At the Failover Domain Configuration dialog box, in the Member Node column, click the node name that you want to delete from the failover domain and click the Remove Member from Domain button. Clicking Remove Member from Domain removes the node from the Member Node column. Repeat this step for each node that is to be deleted from the failover domain. (Nodes must be deleted one at a time.)
When finished, click Close.
At the Cluster Configuration Tool, perform one of the following actions depending on whether the configuration is for a new cluster or for one that is operational and running:
New cluster — If this is a new cluster, choose File => Save to save the changes to the cluster configuration.
Running cluster — If this cluster is operational and running, and you want to propagate the change immediately, click the Send to Cluster button. Clicking Send to Cluster automatically saves the configuration change. If you do not want to propagate the change immediately, choose File => Save to save the changes to the cluster configuration.